个人能力:会限制大模型发挥?
七月初全职独立开发,忙忙碌碌中已经过了四周,最近两个星期在做产品集成大模型的功能,所以在节奏上偏重开发这条线。
开发前感觉复杂,完成后感觉更复杂。
之前对于多款大模型的集成,更多是从技术角度调研文档,再加上重要的前端编程,自己也是半吊子水平,对时间把握上心里没底,所以准备用两周的时间,先把基础能力封装搭建好,方便后续的迭代扩展。
整体流程:【1】熟悉几款模型的接入文档,【2】集成文本模式的对话功能,【3】封装提示词动态管理。
为什么接入完成后感觉更复杂?
在接入并适配业务的过程中,不断的调整和优化提示词,见识到大模型各种场景下的文本能力,也让自己反思AI方向的能力不足,更是缺乏比较系统的知识和经验。
个人能力会限制大模型发挥,我成了AI的那什么猪队友。
为什么只接入文本能力?
在大模型的使用中,感觉最核心的是文本能力,即信息输入的理解和输出的效果,把有限的时间先放在这一块,争取在不断的提问和回复中,找到更加准确高效的对话方式。
遵循熟能生巧的思路,积累一定的文本能力之后,在此基础上挖掘应用场景。
虽然产品只集成了4款模型,但是开发却至少用了7款AI工具,涉及产品和前后端的全部环节,大模型在其他行业使用,效果如何不清楚。
在研发领域,绝对已成气候。
下面将从:集成原理、提示词、数据库、后端接口、前端对接,这5个维度总结整个开发流程。
看了不少开源仓库的教程,以及各个模型的官方文档,这里更多是为了开阔思路,最终还是决定采用稳妥的方式,前端调用后端API,后端处理大模型对接和数据存储。

交互层面看,主要分为3段过程:【1】前后端,【2】后端和大模型,【3】后端和数据库。即产品本身的对话交互,对话调用第三方模型,对话消息的存储管理。
流程层面看,主要分为5段过程:【1】接收用户消息,【2】会话记录管理,【3】对话流程管理,【4】大模型调用,【5】前端输出回复。
在开始具体的代码编程之前,必须先了解提示词的基本用法,即不同身份角色所发出的消息类型。
public enum MessageType {
	/**
	 * A {@link Message} of type {@literal user}, having the user role and originating
	 * from an end-user or developer.
	 * @see UserMessage
	 */
	USER("user"),

	/**
	 * A {@link Message} of type {@literal assistant} passed in subsequent input
	 * {@link Message Messages} as the {@link Message} generated in response to the user.
	 * @see AssistantMessage
	 */
	ASSISTANT("assistant"),

	/**
	 * A {@link Message} of type {@literal system} passed as input {@link Message
	 * Messages} containing high-level instructions for the conversation, such as behave
	 * like a certain character or provide answers in a specific format.
	 * @see SystemMessage
	 */
	SYSTEM("system"),
}
产品集成大模型的对话能力,最常用的就是三种消息类型,具体的场景可以具体的组合设计,AI的本质在追求智能,所以可以做一些跳脱的尝试挖掘模型能力。
目前开发的进度,数据库的设计只有4张关键的表,管理模型和提示词,以及对话数据的存储。
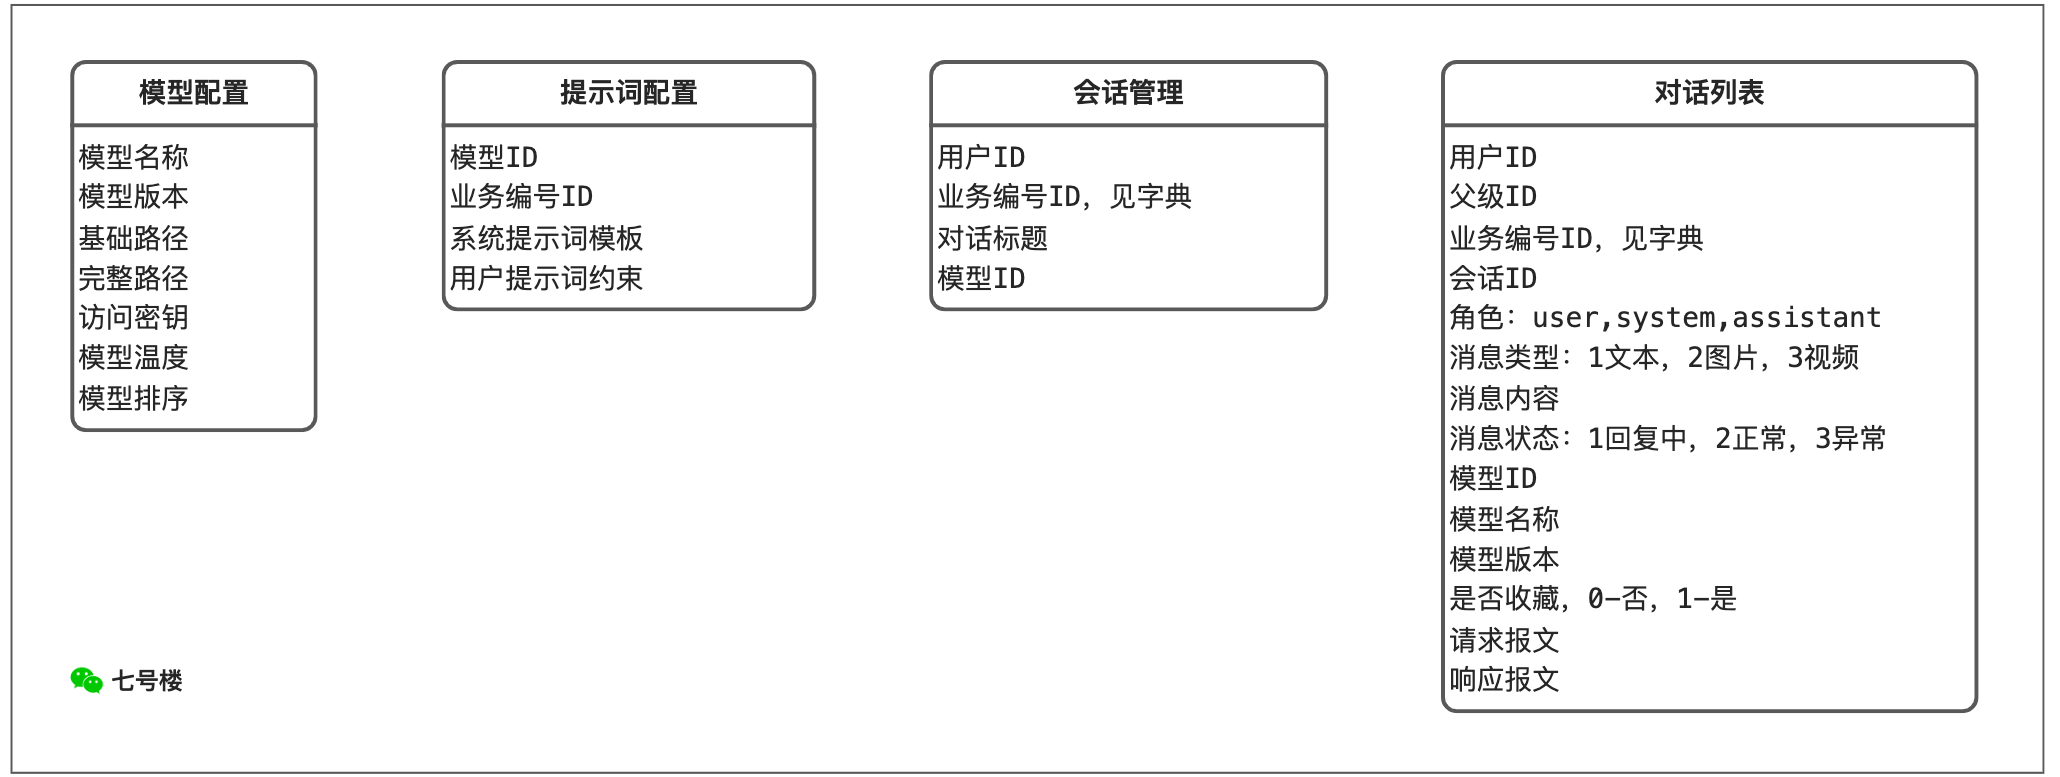
对话模块表结构设计,问过几款主流的模型,给出的结构都很类似,只围绕产品需求做了小部分调整;模型和提示词表结构,是抽取模型组件的API参数。
使用的核心组件是spring-ai-openai的依赖包,主流的模型基本都适配了,该组件定义的模型API接口规范,这样有利于模型统一管理和切换。
    org.springframework.ai
    spring-ai-openai-spring-boot-starter
    ${spring-ai-openai.version}
在具体的使用场景中,通常在提示词中设定系统和用户消息,用来引导模型的回复,通过客户端工具把指令发给具体的模型。
在上篇内容SpringBoot3集成大模型中,使用的就是「阻塞」模式,请求发出后等大模型响应完成,再把结果回传给用户,这种在长文本中体验很差,比较适用内容简短的对话。
@GetMapping(value = "/client")
public String chatClient() {
    String message = "讲个笑话,最好能把我听哭的那一种。";
    return  chatClient.prompt(new Prompt(message)).call().content();
}
后端最初设计的是Flux接口,但是最终没有采用,用的是WebSocket会话方式,具体原因前端对接模块会细说。
大模型不会一次输出完整结果,而是逐步返回中间内容,需要完整的拼接起来才是全部内容,这样可以减少用户等待时间,也降低超时的风险。
@PostMapping(value = "/flux-chat",produces = MediaType.TEXT_EVENT_STREAM_VALUE)
public Flux fluxChat (@RequestBody UserTextDTO dto){
    // 1、参数校验,模型ID和消息
    if (ObjectUtil.hasNull(dto.getMsgText(),dto.getModelId())){
        throw new BizExe(RepCode.PARAM_ERROR);
    }
    // 2、模型校验获取
    ModelConfig model = modelConfigService.checkGetModel(dto.getModelId());
    ChatClient myClient = ModelFactory.getModel(model.getModelVersion());
    // 3、构建会话进程
    chatService.buildUserChat(dto, model, MessageType.USER.getValue());
    // 4、模型对话与本地业务
    return myClient.prompt(new Prompt(dto.getMsgText())).stream().chatResponse()
            .map(chunk -> {
                // 消息响应片段
                Generation generation = chunk.getResult();
                AssistantMessage msg = generation.getOutput();
                // 对话响应
                ChatTextVO chatTextVO = new ChatTextVO();
                chatTextVO.setBlockId(msg.getMetadata().get(ChatParamEnum.MSG_BLOCK_ID.getParam()).toString());
                chatTextVO.setMessageType(msg.getMessageType().toString());
                chatTextVO.setTextContent(msg.getContent());
                return chatTextVO;
            })
            .doOnComplete(() -> {
                log.info("流式响应结束,处理业务===>>>");
            })
            .doOnCancel(() -> {
                log.info("流式响应取消,处理业务===>>>");
            })
            .doOnError(error -> {
                log.info("请求失败: {}",error.getMessage());
            });
}
这里值得注意的问题,如果流式响应完整那最好,但用户可能主动结束等待,或者会发生错误,为了保证流程的完整,需要执行相应的中断方法完善业务逻辑。
此前写过SpringBoot3的系列教程,其中包括如何集成WebSocket组件,源码和案例都已归档在Git仓库,所以这一块就不展开详聊了,重点来看如何集成模型对话。
private static final ConcurrentHashMap chatFlow = new ConcurrentHashMap();
public void socketChat(Session session, ChatTextDTO dto) throws Exception {
    // 1、参数校验
    if (ObjectUtil.hasNull(dto.getMsgText(),dto.getModelId())){
        throw new BizExe(RepCode.PARAM_ERROR);
    }
    // 2、模型校验获取
    ModelConfig model = modelConfigService.checkGetModel(dto.getModelId());
    ChatClient myClient = ModelFactory.getModel(model.getModelVersion());
    // 3、构建会话进程
    this.buildUserChat(dto, model, MessageType.USER.getValue());
    // 4、调用模型服务获取响应流
    Disposable disposable = myClient.prompt(new Prompt(dto.getMsgText()))
            .stream()
            .chatResponse()
            .doOnCancel(() -> {
                log.info("会话结束,处理取消业务");
            })
            .subscribe(
                    chunk -> {
                        // 消息响应片段
                        Generation generation = chunk.getResult();
                        AssistantMessage msg = generation.getOutput();
                        // 响应消息主体
                        ChatTextVO chatTextVO = new ChatTextVO();
                        chatTextVO.setBlockId(msg.getMetadata().get(ChatParamEnum.MSG_BLOCK_ID.getParam()).toString());
                        chatTextVO.setMessageType(msg.getMessageType().toString());
                        chatTextVO.setTextContent(msg.getContent());
                        // 会话中响应数据
                        this.sendMessage(session, chatTextVO);
                    },
                    error -> {
                        log.error("流式处理出错", error);
                    },
                    () -> {
                        log.info("流式响应结束,开始处理业务===>>>");
                    }
            );
    // 方便Session中断时取消模型回复
    chatFlow.put(session.getId(),disposable);
}

private void sendMessage(Session session, Object message) {
    try {
        session.getBasicRemote().sendText(objMapper.writeValueAsString(message));
    } catch (Exception e) {
        log.error("发送WebSocket消息出错", e);
    }
}
基于WebSocket会话模式,其调用的依旧是流式接口,只不过增加了Session和ChatClient整体协调的复杂度,这种模式前端调用更加丝滑。
前端跟大模型对话的场景上,需要实现响应内容的分段输出。一是会提高接口的效率,二是减少用户不必要的等待时间,可以看到实时的内容。
前端是基于vue3和uni-app搭建的框架,所以用到了uni-app提供的request函数,调用这个流式接口。经过各种测试,该函数支持H5和小程序端,在app端不支持分段响应。永远都是把所有的响应一起返回。
于是找了其他办法,比如:1、封装XMLHttpRequest来实现SSE;2、使用分页和轮询模拟流;3、使用RenderJS,RenderJS是uni-app提供的一种运行在视图层的脚本技术,它可以直接操作视图层的DOM和BOM,特别适合处理高性能渲染需求。
第一种方式,在IOS运行没生效,第二种方式,觉得效率不高,第三种方式,小程序端不生效。
最后,左思右想,也参考了很多资料。还是采用websocket。
WebSocket是一种在单个TCP连接上进行全双工通信的协议,它实现了浏览器与服务器之间的实时双向数据交换。
uni-app官方文档上就有专门支持WebSocket的函数,不管是H5端,小程序端,APP端都支持。所以果断采用了这个方案。
不过还是用后端的套路,避免过多的连接和断开连接,这样比较耗费资源,所以将用户的连接采用单例的方式进行管理。
展示一下完整的全局WebSocket管理器集成方案:
interface WebSocketConfig {
  url: string
  headers?: Record
  protocols?: string | string[]
}

interface WebSocketCallbacks {
  onOpen?: (event: any) => void
  onMessage?: (event: any) => void
  onError?: (event: any) => void
  onClose?: (event: any) => void
}

class WebSocketManager {
  private static instance: WebSocketManager
  private socketTask: any = null
  private config: WebSocketConfig | null = null
  private callbacks: WebSocketCallbacks = {}
  private isConnecting = false
  private reconnectTimer: any = null
  private reconnectAttempts = 0
  private maxReconnectAttempts = 5
  private reconnectInterval = 3000

  private constructor() {}

  // 获取单例实例
  static getInstance(): WebSocketManager {
    if (!WebSocketManager.instance) {
      WebSocketManager.instance = new WebSocketManager()
    }
    return WebSocketManager.instance
  }

  // 检查是否已连接
  isConnected(): boolean {
    return this.socketTask && this.socketTask.readyState === 1
  }

  // 连接WebSocket
  async connect(config: WebSocketConfig, callbacks: WebSocketCallbacks = {}): Promise {
    // 如果已经连接且配置相同,直接返回
    if (this.isConnected() && this.isSameConfig(config)) {
      console.log('WebSocket已连接,复用现有连接')
      this.updateCallbacks(callbacks)
      return true
    }

    // 如果正在连接中,等待连接完成
    if (this.isConnecting) {
      console.log('WebSocket正在连接中,等待连接完成')
      return this.waitForConnection()
    }

    // 关闭现有连接
    if (this.socketTask) {
      this.disconnect()
    }

    this.config = config
    this.callbacks = callbacks
    this.isConnecting = true

    return new Promise((resolve) => {
      console.log('开始连接WebSocket:', config.url)

      this.socketTask = uni.connectSocket({
        url: config.url,
        header: config.headers || {},
        protocols: config.protocols,
        success: () => {
          console.log('WebSocket连接请求发送成功')
        },
        fail: (error) => {
          console.error('WebSocket连接请求失败:', error)
          this.isConnecting = false
          this.callbacks.onError?.(error)
          resolve(false)
        }
      })

      // 连接打开
      this.socketTask.onOpen((event: any) => {
        console.log('WebSocket连接已打开')
        this.isConnecting = false
        this.reconnectAttempts = 0
        this.clearReconnectTimer()
        this.callbacks.onOpen?.(event)
        resolve(true)
      })

      // 接收消息
      this.socketTask.onMessage((event: any) => {
        this.callbacks.onMessage?.(event)
      })

      // 连接错误
      this.socketTask.onError((event: any) => {
        console.error('WebSocket连接错误:', event)
        this.isConnecting = false
        this.callbacks.onError?.(event)
        this.scheduleReconnect()
        resolve(false)
      })

      // 连接关闭
      this.socketTask.onClose((event: any) => {
        console.log('WebSocket连接已关闭:', event)
        this.isConnecting = false
        this.callbacks.onClose?.(event)

        // 如果不是主动关闭,尝试重连
        if (event.code !== 1000) {
          this.scheduleReconnect()
        }

        if (!this.isConnected()) {
          resolve(false)
        }
      })
    })
  }

  // 发送消息
  send(data: string | ArrayBuffer): boolean {
    if (!this.isConnected()) {
      console.error('WebSocket未连接,无法发送消息')
      return false
    }

    this.socketTask.send({
      data: data,
      success: () => {
        console.log('WebSocket消息发送成功')
      },
      fail: (error: any) => {
        console.error('WebSocket消息发送失败:', error)
      }
    })

    return true
  }

  // 断开连接
  disconnect(): void {
    this.clearReconnectTimer()

    if (this.socketTask) {
      this.socketTask.close({
        code: 1000,
        reason: '主动断开连接'
      })
      this.socketTask = null
    }

    this.isConnecting = false
    this.config = null
    this.callbacks = {}
    this.reconnectAttempts = 0
    console.log('WebSocket连接已断开')
  }

  // 更新回调函数
  updateCallbacks(callbacks: WebSocketCallbacks): void {
    this.callbacks = { ...this.callbacks, ...callbacks }
  }

  // 获取连接状态
  getStatus(): string {
    if (this.isConnected()) return 'connected'
    if (this.isConnecting) return 'connecting'
    return 'disconnected'
  }
}

// 导出单例实例
export const websocketManager = WebSocketManager.getInstance()

// 导出类型
export type { WebSocketConfig, WebSocketCallbacks }
// 基本连接
const connected = await websocketManager.connect({
  url: 'ws://example.com/socket',
  headers: {
    'Authorization': 'Bearer token'
  }
}, {
  onMessage: (event) => {
    console.log('收到消息:', event.data)
  }
})
// 检查是否已连接
if (websocketManager.isConnected()) {
  // 直接使用现有连接
  websocketManager.send('hello')
} else {
  // 需要先连接
  await websocketManager.connect(config, callbacks)
}
// 发送消息
const success = websocketManager.send(JSON.stringify(data))
if (!success) {
  console.error('发送失败,连接未建立')
}
基于上面的封装,其实还有一点要考虑,WebSocket连接的断开时机,分了三个维度去考虑这个事情:
所以对上面的WebSocketManager做了调整。
class WebSocketManager {
  private static instance: WebSocketManager
  private socketTask: any = null
  private config: WebSocketConfig | null = null
  private pageCallbacks: Map = new Map()
  private currentPageId: string = ''
  private connecting = false
  private reconnectTimer: any = null
  private reconnectAttempts = 0
  private maxReconnectAttempts = 5
  private reconnectInterval = 3000

  // 连接管理相关
  private lastActivityTime: number = Date.now()
  private activityTimer: any = null
  private inactivityTimeout = 30 * 60 * 1000 // 30分钟无活动自动断开
  private isAppInBackground = false

  // 发送消息
  send(data: string | ArrayBuffer): boolean {
    if (!this.isConnected()) {
      console.error('WebSocket未连接,无法发送消息')
      return false
    }

    // 记录用户活动
    this.recordActivity()

    this.socketTask.send({
      data: data,
      success: () => {
        console.log('WebSocket消息发送成功')
      },
      fail: (error: any) => {
        console.error('WebSocket消息发送失败:', error)
      }
    })

    return true
  }

  // 记录用户活动
  recordActivity(): void {
    this.lastActivityTime = Date.now()
    this.resetActivityTimer()
  }

  // 重置活动计时器
  private resetActivityTimer(): void {
    if (this.activityTimer) {
      clearTimeout(this.activityTimer)
    }

    this.activityTimer = setTimeout(() => {
      console.log('WebSocket长时间无活动,自动断开连接')
      this.disconnect()
    }, this.inactivityTimeout)
  }

  // 应用进入后台
  onAppHide(): void {
    console.log('应用进入后台,断开WebSocket连接')
    this.isAppInBackground = true
    this.disconnect()
  }

  // 应用回到前台
  onAppShow(): void {
    console.log('应用回到前台')
    this.isAppInBackground = false
  }

  // 用户登出时断开连接
  onUserLogout(): void {
    console.log('用户登出,断开WebSocket连接')
    this.disconnect()
  }

  // 断开连接
  disconnect(): void {
    this.clearReconnectTimer()
    this.clearActivityTimer()

    if (this.socketTask) {
      this.socketTask.close({
        code: 1000,
        reason: '主动断开连接'
      })
      this.socketTask = null
    }

    this.connecting = false
    this.config = null
    this.pageCallbacks.clear()
    this.currentPageId = ''
    this.reconnectAttempts = 0
    console.log('WebSocket连接已断开')
  }

  // 清理活动计时器
  private clearActivityTimer(): void {
    if (this.activityTimer) {
      clearTimeout(this.activityTimer)
      this.activityTimer = null
    }
  }
}
增加生命周期管理类
/**
 * 应用生命周期管理
 * 处理WebSocket连接的智能断开和重连
 */

import { websocketManager } from './websocket'

class AppLifecycleManager {
  private static instance: AppLifecycleManager
  private isInitialized = false

  // 初始化应用生命周期监听
  init(): void {
    if (this.isInitialized) {
      console.log('应用生命周期管理已初始化')
      return
    }

    console.log('初始化应用生命周期管理')

    // 监听应用隐藏(进入后台)
    uni.onAppHide(() => {
      console.log('应用进入后台')
      websocketManager.onAppHide()
    })

    // 监听应用显示(回到前台)
    uni.onAppShow(() => {
      console.log('应用回到前台')
      websocketManager.onAppShow()
    })

    // 监听网络状态变化
    uni.onNetworkStatusChange((res) => {
      console.log('网络状态变化:', res)
      if (!res.isConnected) {
        console.log('网络断开,断开WebSocket连接')
        websocketManager.disconnect()
      }
      // 网络恢复时不自动重连,等待用户操作
    })

    this.isInitialized = true
  }

  // 用户登出时调用
  onUserLogout(): void {
    console.log('用户登出,清理WebSocket连接')
    websocketManager.onUserLogout()
  }
}

// 导出单例实例
export const appLifecycleManager = AppLifecycleManager.getInstance()
最后,是断开连接的用法。
import { defineStore } from 'pinia';
import { appLifecycleManager } from '@/utils/app-lifecycle';

export const useUserStore = defineStore('user', {
  actions: {
    // 退出登录
    logout() {
      this.userInfo = null;
      this.token = '';
      this.isLoggedIn = false;

      // 清除本地存储
      uni.removeStorageSync('token');
      uni.removeStorageSync('userInfo');

      // 断开WebSocket连接
      appLifecycleManager.onUserLogout();
    }
  }
});
上面贴了部分核心代码,不过都是以自己后端的角度去考虑的。
最后,呼应上面,再列举不断开连接的情况。
这套封装,使WebSocket连接完全抽离为全局管理,首次进入页面会检查连接状态,有连接就复用,没有就初始化,外部只需要定义URL和请求头即可。
并且,连接也具有完整的智能管理策略,能够在合适的时机自动断开连接,既保证了用户体验,又优化了资源使用。
对于大模型的集成,本质就是第三方API的调用,刚开始做的时候也有点犯难,不过花时间和心思研究文档之后,其实原理并不算复杂。
所谓套壳大模型的产品,体验上的差距更多在于:开发者对模型能力的理解和运用。有句话现在越来越认可,人工智能时代:模型本身即产品。
文档仓库:
https://gitee.com/cicadasmile/butte-java-note

源码仓库:
https://gitee.com/cicadasmile/butte-mound
 登录查看全部
参与评论
手机查看
返回顶部