认真对待每时、每刻每一件事,把握当下、立即去做。
MVC 模式的目的是实现一种动态的程序设计,使后续对程序的修改和扩展简化,并且使程序某一部分的重复利用成为可能。除此之外,此模式通过对复杂度的简化,使程序结构更加直观。下面主要对 MVC 架构下的优化方案以及其项目结构解析。
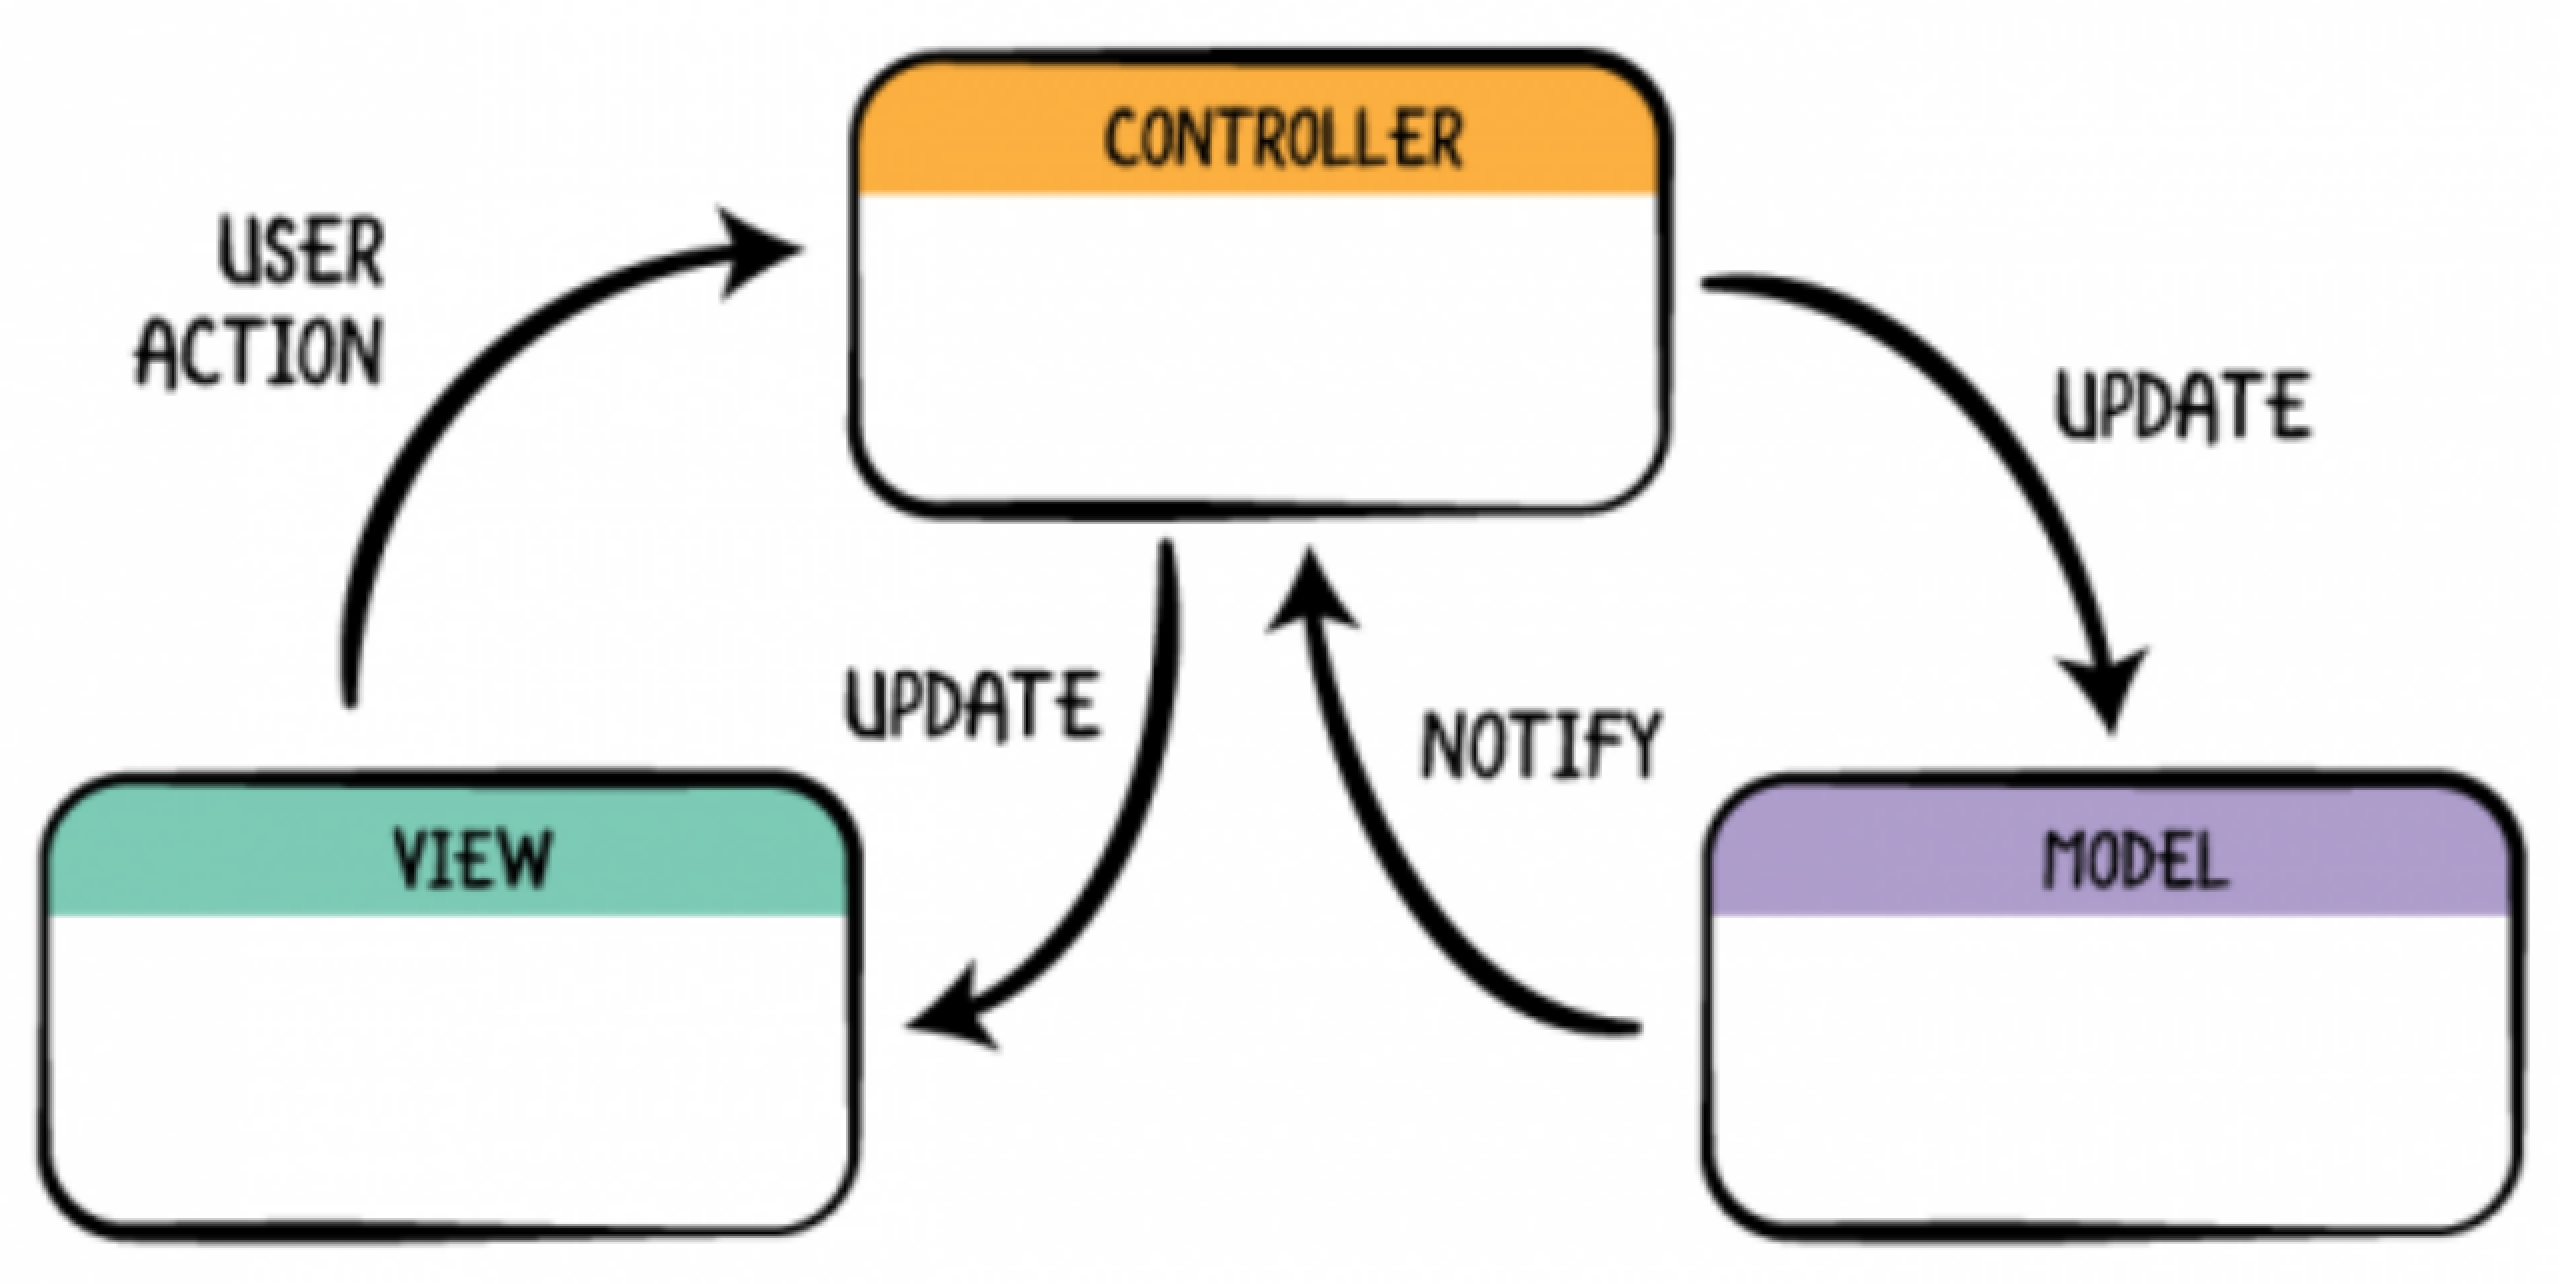
控制器(Controller)-->业务层, Model 与 View 层的中介,负责转发请求,对请求进行处理,把 Model 数据在 View 上展示出来。
主要职责:
视图(View) -->展现层,承载 UI 展示和事件响应(交互)。
主要职责:
模型(Model) -->数据层,数据处理层,包括网络请求,数据加工,算法实现等。
主要职责:

在 iOS 中的 Controlller 是 UIViewController,所以导致很多人会把视图写在 Controller 中,如下图:
@implementation DemoViewController

- (void)viewDidLoad {
    [super viewDidLoad];

    //setupUI

    //1.createView
    UIView *view = [[UIView alloc]init];
    view.frame = CGRectMake(100, 100, 100, 100);
    view.backgroundColor = [UIColor orangeColor];
    [self.view addSubview:view];

    //2.createButton
    UIButton *btn = [UIButton buttonWithType:UIButtonTypeInfoDark];
    btn.center = self.view.center;
    [self.view addSubview:btn];

    //3...
}
这种写法在我刚学习编程的时候也这样写过,先说这样写的好处,以及初学者为什么会这么写:
add target: 添加点击事件,在当前控制器内就能调用到点击方法,不需要设置代理之类的;controller 就行,因为View 写在 Controller 里面,不用去别的地方找就这里有;View 在 Controller 中就能拿到资源,不需要传值;缺点:
Controller 特别臃肿,里面代码特别多,视图一复杂起来,代码量可能过1000行,不好维护;Controller 里无法复用,除非你在 VC2 里面 copy 当前 VC 中的 View 的代码;MVC,是 MC 架构;如何告别 MC 模式,真正走到 MVC?
先给自己洗脑,iOS 的 Controller 不是 UIViewController,而是普通的 Controller,没有 View。(很关键的一步)。
模块化划分,每个模块对应自己的一个 View,例如 Demo 模块,View 层里面有个 DemoView,将界面元素写到 View 中。
通过代理(delegate),代理委托模式通过定义协议方法实现解耦, View 只关心事件触发不处理具体逻辑;
// 1. 定义协议
@protocol CustomViewDelegate
- (void)customView:(UIView *)view didTapButton:(UIButton *)button;
@end

// 2. View 持有 delegate 弱引用
@interface CustomView : UIView
@property (nonatomic, weak) id delegate;
@end

@implementation CustomView
- (void)buttonTapped:(UIButton *)sender {
    [self.delegate customView:self didTapButton:sender]; // 触发代理方法
}
@end

// 3. Controller 实现协议
@interface ViewController ()
@end

@implementation ViewController
- (void)viewDidLoad {
    CustomView *view = [[CustomView alloc] init];
    view.delegate = self; // 设置代理
}

- (void)customView:(CustomView *)view didTapButton:(UIButton *)button {
    NSLog(@"Delegate: 按钮点击事件处理"); // Controller 响应事件
}
@end
在 Controller 设置 target-action 监听,Controller 给 View 添加一个 target,当用户的触摸事件发生时,view 产生 action,Controller 接收到之后做出相应的响应,直接建立 View 与控制器的响应链关系,适合简单控件事件;
// 1. View 暴露添加 target 的方法
@interface CustomView : UIView
- (void)addTarget:(id)target action:(SEL)action;
@end

@implementation CustomView {
    id _target;
    SEL _action;
}

- (void)addTarget:(id)target action:(SEL)action {
    _target = target;
    _action = action;
}

- (void)buttonTapped {
    #pragma clang diagnostic push
    #pragma clang diagnostic ignored "-Warc-performSelector-leaks"
    [_target performSelector:_action withObject:self]; // 执行 Action
    #pragma clang diagnostic pop
}
@end

// 2. Controller 设置 Target-Action
@implementation ViewController
- (void)viewDidLoad {
    CustomView *view = [[CustomView alloc] init];
    [view addTarget:self action:@selector(handleButtonTap:)]; // 绑定事件
}

- (void)handleButtonTap:(CustomView *)sender {
    NSLog(@"Target-Action: 按钮点击事件处理"); // Controller 响应事件
}
@end
通过数据源模式 data source,通过数据驱动 UI 更新,控制器实现数据获取协议供 View 调用;
// 1. 定义数据源协议
@protocol CustomViewDataSource
- (NSString *)textForButtonInView:(CustomView *)view;
@end

// 2. View 持有 dataSource 引用
@interface CustomView : UIView
@property (nonatomic, weak) id dataSource;
- (void)reloadData; // 触发数据更新
@end

@implementation CustomView
- (void)reloadData {
    NSString *text = [self.dataSource textForButtonInView:self]; // 获取数据
    [_button setTitle:text forState:UIControlStateNormal];
}
@end

// 3. Controller 实现数据源
@interface ViewController ()
@end

@implementation ViewController
- (void)viewDidLoad {
    CustomView *view = [[CustomView alloc] init];
    view.dataSource = self;
    [view reloadData]; // 初始化数据
}

- (NSString *)textForButtonInView:(CustomView *)view {
    return @"DataSource 模式"; // 提供动态数据
}
@end
Block(闭包):View 定义闭包属性,Controller 通过赋值闭包来响应事件。优点,代码紧凑,适合简单回调。缺点,需注意循环引用(使用 [weak self])。
class CustomView: UIView {
    var onButtonTap: (() -> Void)?
    @objc func buttonTapped() { onButtonTap?() }
}
// Controller 中赋值
customView.onButtonTap = { [weak self] in self?.handleTap() }
我们来看下这里的 Model 层通信,先看一段代码。
@implementation DemoViewController

- (void)viewDidLoad {
    [super viewDidLoad];

    //loadDatas
    [[AFHTTPSessionManager manager]GET:url
                            parameters:parameters
                              progress:nil
                               success:^(NSURLSessionDataTask * _Nonnull task, id  _Nullable responseObject)
    {
        //刷新tableView
        _datas = responseObject;
        [_tableView reloadDatas];

    } failure:nil];
}
这种写法在我刚学习编程的时候也这样写过,先说这样写的好处,以及初学者为什么会这么写:
TableView 的数据源;controller 就行,因为数据请求 写在 Controller 里面,不用去别的地方找,就这里有;uuid,这样写的好处,可以直接让当前请求在 Controller 中就能拿到资源,不需要传值;缺点:
Controller 特别臃肿,里面代码特别多,如果当前控制器需要多次请求,代码量可能过1000行,不好维护;Controller 里无法复用,除非你在 VC2 里面 copy 当前 VC 中的 网络请求的代码;MVC,如果你还用了上面的 View 写在 Controller 的操作的话,恭喜你,最终大法 - Controller 架构 顺利完成,并不需要什么 Model && View;这 iOS 的 Controller 就算是 UIViewController,也没看到 Model 啊,没有 Model。(很关键的一步);
模块化划分,每个模块对应自己的一个 Model,例如 Demo 模块,Model 层里面有个 DemoModel,将网络请求&&数据处理写到 Model 中;
Controller 层直接调用 Model 层类方法和实例方法,并通过参数传值。
Model 层数据如何回调到 Controller 层,Controller 层如何知道 Model 层数据发生了改变。
轻量级单向通信,适合简单回调但需注意循环引用
//Model
@implementation DemoModel

+ (void)fetchDatasWithUUid:(NSString *)uuid success:(successBlock)block{

    //Model发送网络请求
    NSDictionary *parameters = @{@"uuid":uuid}
        [[AFHTTPSessionManager manager]GET:url
                                parameters:parameters
                                  progress:nil
                                   success:^(NSURLSessionDataTask * _Nonnull task, id  _Nullable responseObject)
        {
            //通过block异步回调~
            block(responseObject);

        } failure:nil];
}

//Controller
@implementation DemoViewController

- (void)viewDidLoad {
    [super viewDidLoad];

    //loadDatas
    [DemoModel fetchDatasWithUUid:_uuid success:^(NSArray *array) {
        _datas = array;
        [_tableView reloadDatas];
    }];
}
KVO(监听),监听 Model 的每个属性的变化来做出响应;
// Model.h
@interface MyModel : NSObject
@property (nonatomic, strong) NSString *data;
@end

// Controller.m
- (void)viewDidLoad {
    [super viewDidLoad];
    [self.model addObserver:self
                 forKeyPath:@"data"
                    options:NSKeyValueObservingOptionNew
                    context:nil];
}

- (void)observeValueForKeyPath:(NSString *)keyPath
                      ofObject:(id)object
                        change:(NSDictionary *)change
                       context:(void *)context {
    if ([keyPath isEqualToString:@"data"]) {
        self.label.text = change[NSKeyValueChangeNewKey]; // 响应变化
    }
}

- (void)dealloc {
    [self.model removeObserver:self forKeyPath:@"data"];
}
Notification(通知),Model 中创建一个 NSNotificationCenter,在 Controller 中创建一个方法来接收通知。当 Model 发生变化时,他会发送一个通知,而 Controller 会接收通知,一对多广播式通信,适合跨模块解耦但性能开销较大。
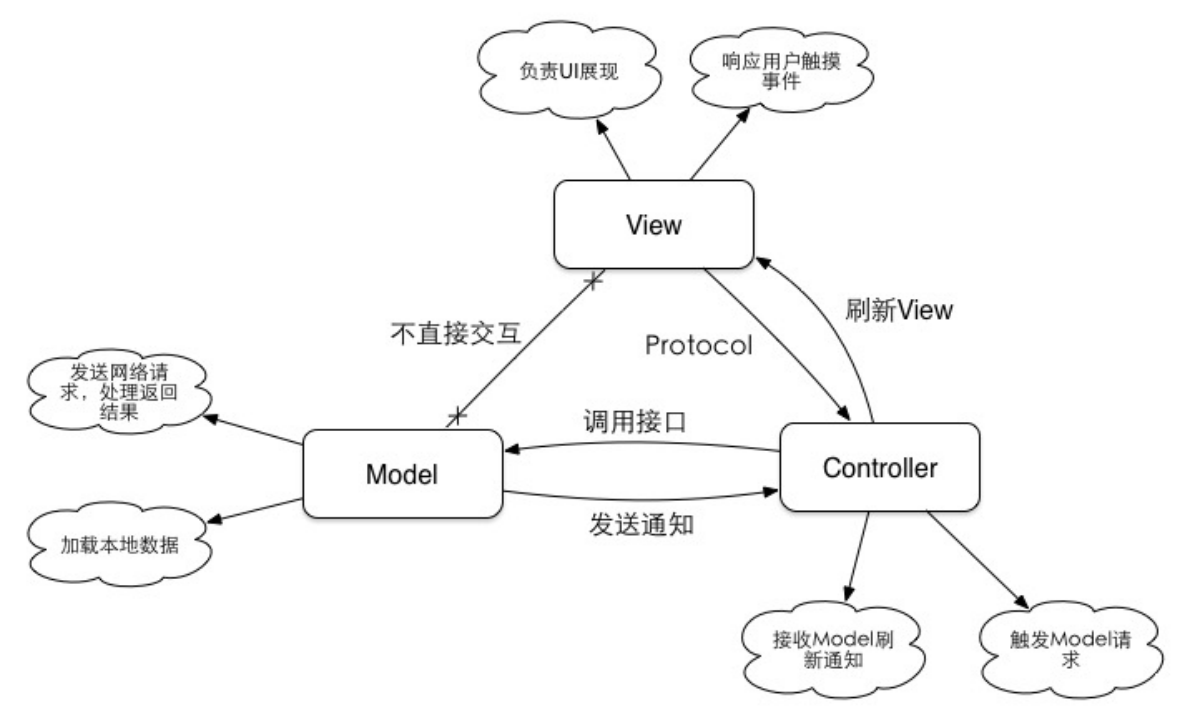
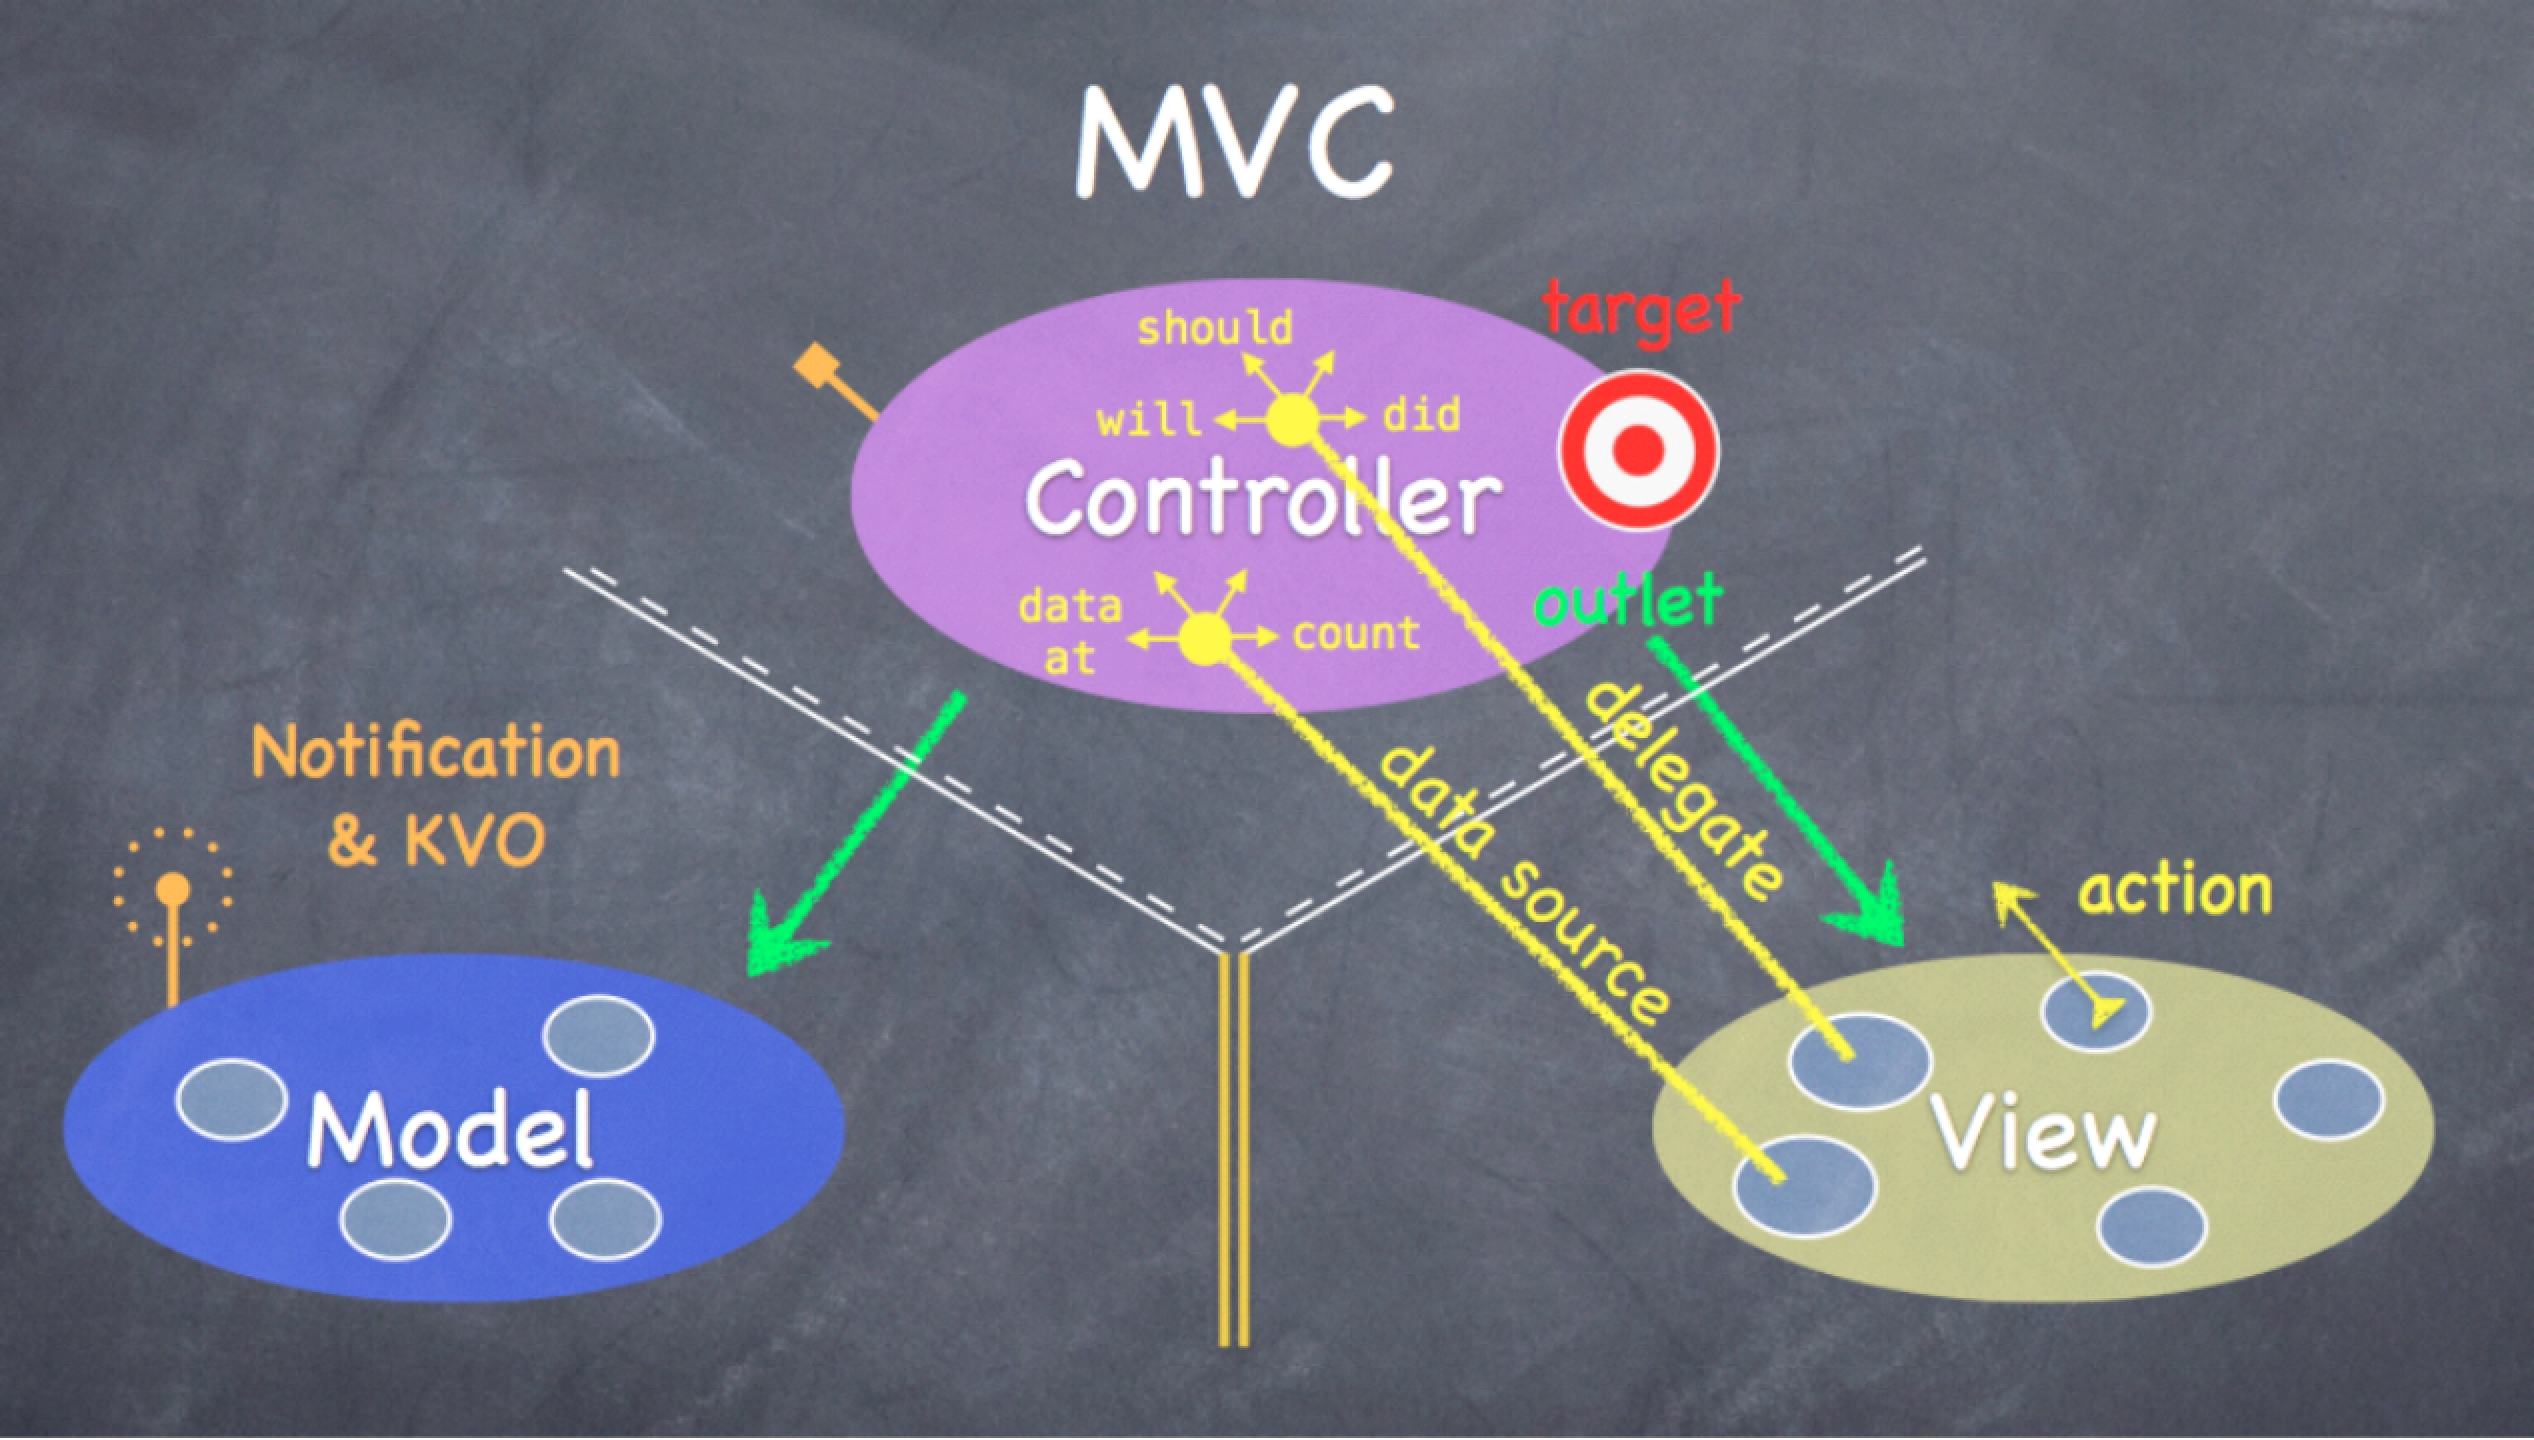
解释一下上面这幅图,一个完整的模块被分为了三个相对独立的部分,分别是Model,View,Controller,对应到我们 App 中的依次为继承自 NSObject 的数据中心,承载 UI 展示和事件响应的 View 以及我们最最常用的 UIViewController。
其中 VC 持有 View 和 Model 部分,View 通过代理或者 Target-Action 的方式把用户的操作传递给 VC,VC 负责根据不同的用户行为做出不同响应。如果需要加载或刷新数据则直接调用 Model 暴露的接口,如果数据可以同步拿到,则直接使用获取到的数据刷新 View。如果数据需要通过网络请求等其他异步的方式获取,VC 则通过监听 Model 发出的数据更新(成功或失败)通知,在收到通知时根据成功或者失败对 View 进行相应的刷新操作。可以看出来整个过程中 View 和 Model 是没有直接交互的,所有的操作都是通过 VC 进行协调的。
基础的 MVC 讲解完毕,其实本质上就是让 Controller 减压,不该控制器管的他别让他知道,如上基础 MVC 操作之后的优势:
View 就行,其他同理,Controller 代码大大减少,负责 View 的代理事件就可以;VC1 && VC2 调用函数 [ProductModel fetchDatas] 即可,无需写多次,View 的复用同理;苹果使用的 MVC 的定义是这么说的:所有的对象都可以被归类为一个 Model,一个 View,或是一个控制器。就这些,那么把网络代码放哪里?和一个 API 通信的代码应该放在哪儿?
你可能试着把它放在 Model 对象里,但是也会很棘手,因为网络调用应该使用异步,这样如果一个网络请求比持有它的 Model 生命周期更长,事情将变的复杂。显然也不应该把网络代码放在 View 里,因此只剩下控制器了。这同样是个坏主意,因为这加剧了厚重控制器的问题。那么应该放在那里呢?显然 MVC 的 3 大组件根本没有适合放这些代码的地方。
网络请求与数据处理的归属争议:
纯数据模型派:
认为 Model 应仅定义数据结构,网络请求和数据处理应由 Controller 或单独的服务类(如 NetworkManager)处理。
增强 Model 派:
支持将网络请求封装在 Model 内部,通过扩展方法或静态函数实现,例如:
extension NGLoginModel {
    static func fetchAccount(completion: @escaping (NGLoginModel?) -> Void) {
        NetworkManager.request(url: "api/login") { data in
            let account = NetcallAccount(data: data)
            completion(NGLoginModel(info: account))
        }
    }
}
这种方式保持数据与获取逻辑的紧密性,但可能增加 Model 的复杂度。
 登录查看全部
参与评论
手机查看
返回顶部